Imagine transforming all your business manuals, guides, reports, and ebooks into a chatbot that can answer user questions in real-time, directly from your website. In less than 10 minutes, you can build your own AI chatbot and train it to answer queries based on your PDFs, Word documents, PowerPoint presentations, and other file types—all without writing a single line of code.
Think about it: Instead of manually sorting through hundreds of pages of reports or guides, your chatbot will instantly find and relay the relevant information to users. This not only saves time but also enhances the user experience by offering instant, accurate responses. And the best part? You don’t need to be a developer or tech expert to pull this off. With cloud tools and AI, building and training a chatbot has never been easier.
In this guide, you\’ll learn how to:
- Build a chatbot and train its knowledge base using your data.
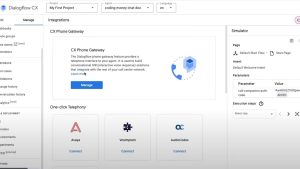
- Integrate the chatbot into platforms like websites, Facebook Messenger, Slack, Discord, and Telegram.
- Enable voice and chat functionalities.
- Test your chatbot and view conversation analytics.
If you’re excited to see how this works, keep reading, and by the end, you’ll have a fully functional chatbot that can process and answer user queries using the data from your documents.
Step-by-Step Guide to Building a Chatbot

1. Setting Up Your Cloud Environment
The first step in creating your custom chatbot is to set up the cloud environment that will host your bot. For this tutorial, we\’ll be using Google Cloud’s Vertex AI and Dialogflow.
To get started, head over to cloud.google.com and log in to your Google account. Once logged in, you’ll need to navigate to the Google Cloud Console.
From there:
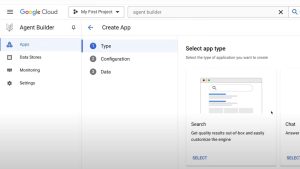
- In the search bar, type Agent Builder and click on it.
- Before you proceed, ensure that both the Vertex AI API and Dialogflow APIs are enabled. If they’re not, enable them when prompted. These are essential tools that will power your chatbot.
By enabling these APIs, you’re providing your chatbot with the ability to understand, interpret, and respond to the data you input.
2. Creating a New Chatbot Agent
Now that your environment is ready, it’s time to create the actual chatbot. This is the virtual assistant that will interact with users and respond to their queries.
- Select the option for Chat when prompted.
- Enter your company name (or whatever name best describes your chatbot’s purpose).
- Give your agent a unique name, something that aligns with its role, such as “SupportBot” or “InfoBot,” and click Continue.
This agent will serve as the core of your chatbot. It’s essentially the “brain” that handles all the logic and responses.
3. Building the Data Store

The data store is where your chatbot will pull its information from. This is critical because it tells the chatbot where to find the answers to user queries. Your data store will be made up of the documents you upload—PDFs, manuals, guides, ebooks, etc.
To create the data store:
- Click Create Data Store.
- You’ll see three options for inputting data:
- Website URL: The chatbot can crawl content from specific domains.
- Cloud Storage: Import data directly from a Google Cloud storage bucket.
- Manual Import: Use the API to import data manually.
For this example, we’ll use Cloud Storage. Upload a file, and this file will act as the primary source of information for your chatbot.
- Select Cloud Storage and upload your desired document (PDF, HTML, TXT, CSV, Word, or PowerPoint).
- Click Select, then choose the file you’ve uploaded.
At this stage, you have the flexibility to upload structured or unstructured documents. For unstructured documents like PDFs or Word files, the AI will use its parsing capabilities to extract relevant information. If you prefer to work with structured data, you can also use formats like JSON or CSV to define more specific intents and responses.
4. Naming the Data Store
Once your document is uploaded, it’s time to give the data store a name. Choose something that reflects the content, like “US Budget 2025” if you’re working with a government report. After that, click Create to finalize the data store.
Naming your data store appropriately helps in organizing and identifying multiple datasets, especially if you plan to create more chatbots down the road.
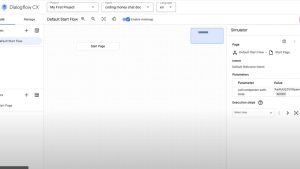
5. Previewing and Testing Your AI Chatbot
With the data store in place, you’re now ready to preview how the chatbot will function. Google’s AI tools make it easy to see a preview of the chatbot in action.
To test it:
- Click Preview to see how the bot responds to different queries.
Testing your chatbot is crucial for understanding its capabilities and limitations. This step allows you to see how well the AI interprets user input and retrieves information from the data you’ve uploaded.
For example, you could type a basic query like Hello and see how the bot responds. From this screen, you’ll also have the ability to customize and fine-tune the chatbot’s responses.
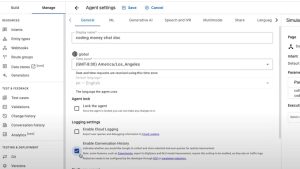
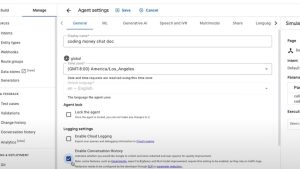
6. Customizing Conversation Logging
At this point, you may want to enable logging so that you can monitor the conversations your chatbot has with users. This is useful for tracking the types of questions being asked and understanding how well the bot performs.
To enable logging:
- Go to Manage, and check the box for Enable Conversation History.
- Once activated, you’ll be able to view all previous interactions between your chatbot and users.
This data can be extremely helpful when it comes to improving the chatbot\’s responses and adding more relevant data to the knowledge base. For example, if you notice that users are frequently asking questions about a certain topic, you can enhance the chatbot’s answers by uploading additional documents or FAQs.
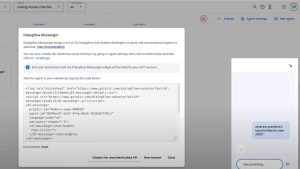
7. Integrating the Chatbot on Your Website
Once your chatbot is fully trained and tested, it’s time to put it to work on your website or other platforms. One of the great things about this setup is the ability to integrate the chatbot on different platforms, including websites, messaging apps, and social media platforms.
To add the chatbot to your website:
- Go to the Integrations tab and select Unauthenticated API.
- Click Enable to allow users to interact with the chatbot without having to log in or provide credentials.
After enabling the API, you’ll receive a snippet of code that you can embed into your website. This will allow users to interact with the chatbot directly from your site. To preview how it will appear, click Try It Now. The chatbot icon will show up in the bottom-right corner of your screen.
This means that when users visit your website, they’ll be able to ask the chatbot questions and receive immediate answers based on the data you uploaded.
8. Testing Real-Life Scenarios
Now that your chatbot is live, it’s time to put it through its paces with real-life scenarios. The key here is to ask questions that reflect the types of queries users are likely to have.
For instance, if you’ve uploaded a government document or report, you might ask:
- What are the president’s top priorities for 2025?
In response, the chatbot will search the document and retrieve the relevant information. For example, it might say, \”The president\’s top economic priorities include lowering costs for American families, reducing prescription drug prices, and tackling junk fees from airlines and banks.\”
You can even click on the response to see the exact page from which the chatbot pulled the information.
Other sample questions you could ask include:
- What has the president invested in?
- What are the major accomplishments of the current administration?
The AI will pull accurate answers based on the data you provided, such as historic investments in healthcare, infrastructure, and legislation. The chatbot’s ability to ground its responses in real data is one of the most powerful aspects of this system.
9. Viewing Conversation History and Analytics
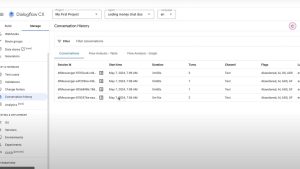
A huge advantage of using AI-powered chatbots is the ability to track and analyze user interactions. This data can be used to refine your chatbot’s responses and improve user satisfaction.
To view conversation history:
- Go to the Conversation History tab in your agent’s settings.
- Here, you can see a log of past interactions, allowing you to analyze common queries and track the chatbot’s performance.
This feature is incredibly useful, especially if you notice any recurring patterns in user behavior. For example, if multiple users are asking the same question, it might be a good idea to add more data to the chatbot’s knowledge base to ensure it can handle those inquiries more effectively.
Final Thoughts
And there you have it—your very own custom AI chatbot created in less than 10 minutes! By leveraging Google Cloud’s Vertex AI and Dialogflow, you’ve built a chatbot that can process and respond to hundreds of different queries using the data from your documents, PDFs, guides, and reports.
What’s more, you didn’t need any coding skills to achieve this. With a few simple steps, you now have a powerful tool that can enhance user engagement on your website, streamline customer support, and provide instant access to critical information.
This chatbot is just the beginning. There are countless ways to expand its capabilities, from adding voice interactions to deploying it across different platforms like Slack, Facebook Messenger, or Telegram. The possibilities are endless!
Now that you’ve successfully built and integrated your chatbot, why not experiment with additional data sources? Try uploading more documents or even structured data like FAQs to further enhance its accuracy and functionality.
Happy chatbot building!